Last Updated on May 4, 2023 by Dee
Are you ready to unlock the full potential of your artistic endeavors in Procreate? If you’ve been struggling with managing layers and wondering how to select multiple layers in Procreate, then buckle up! In this comprehensive guide, we’re going to help you take your digital art game to the next level.
Gone are the days of wasting precious time tediously manipulating individual layers. With our step-by-step tutorial, you’ll be mastering the art of multi-layer selection in no time, allowing you to spend more time focusing on the fun part – creating breathtaking works of art!
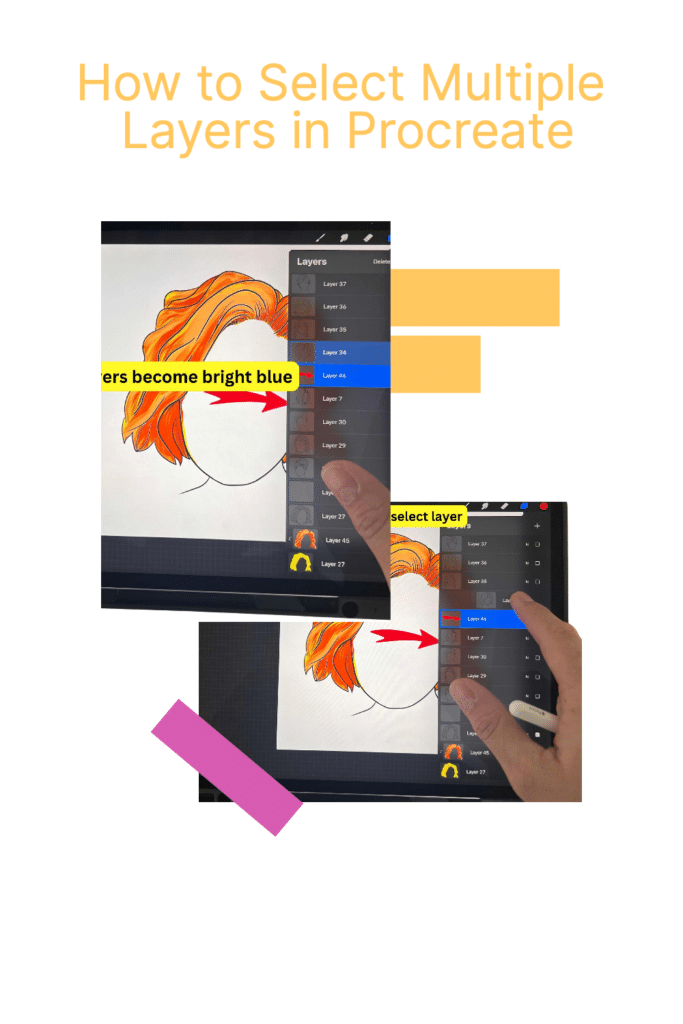
Selecting Multiple Layers in Procreate
Procreate is an excellent tool for digital artists who want to create stunning illustrations and designs. One of the most important features of Procreate is the ability to work with multiple layers. This section will explore how to select, group, move, and deselect multiple layers in Procreate.
[Check out my Procreate Stamps HERE.]
How to Select Multiple Layers
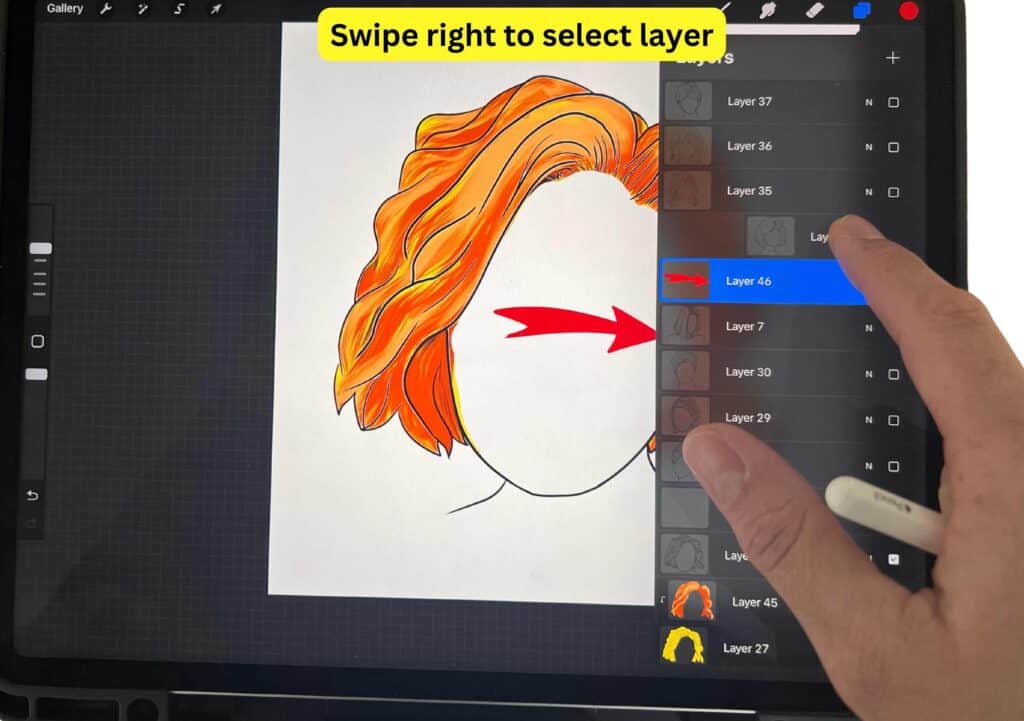
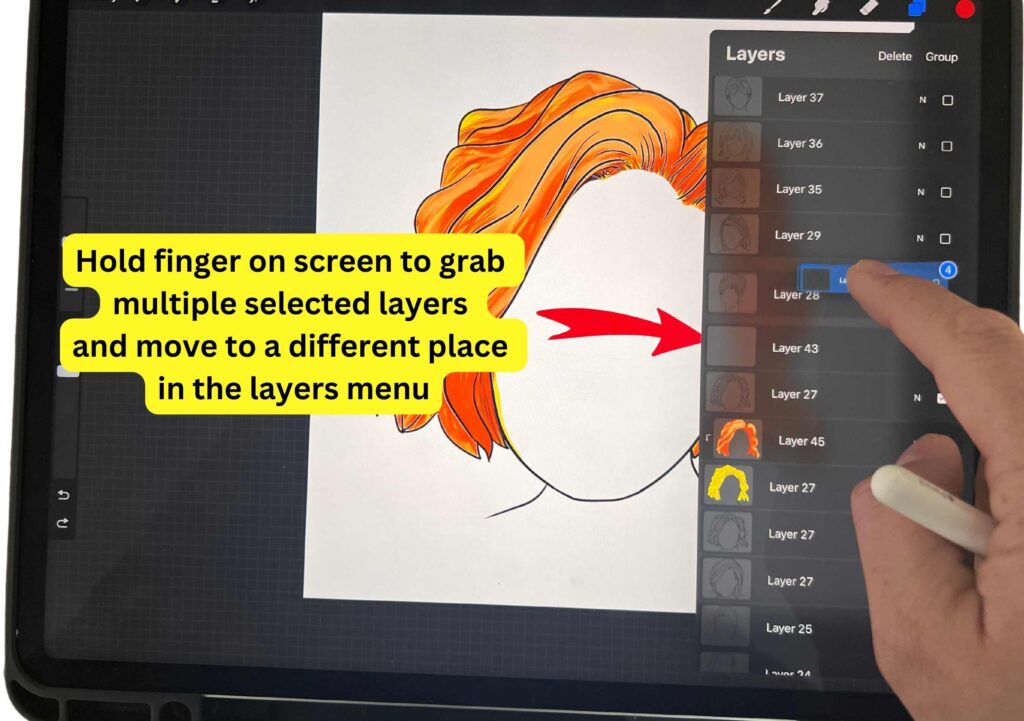
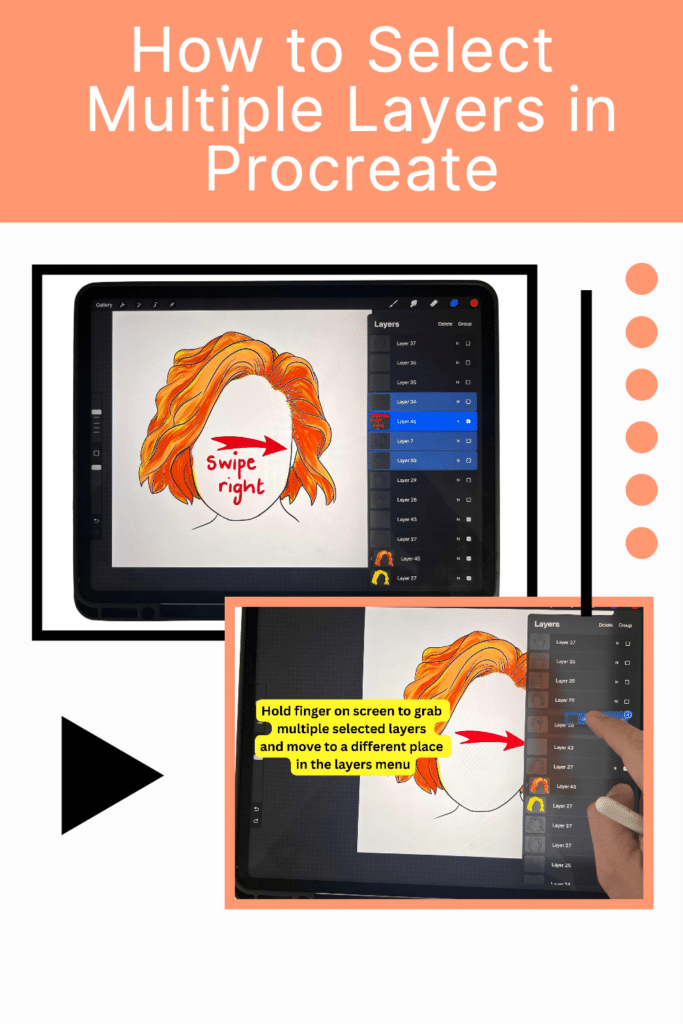
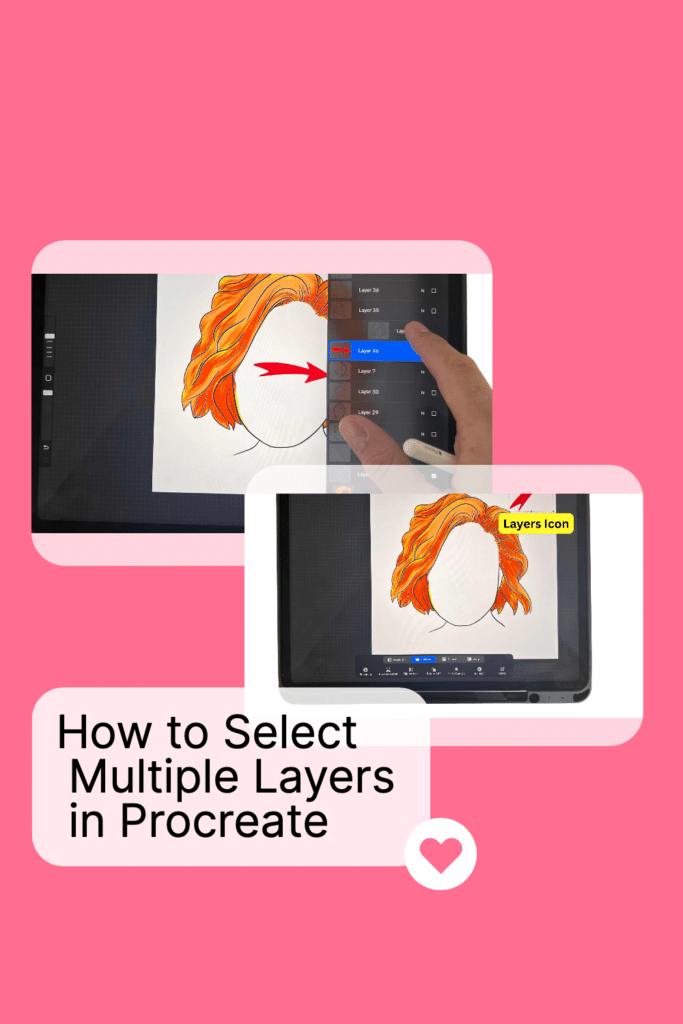
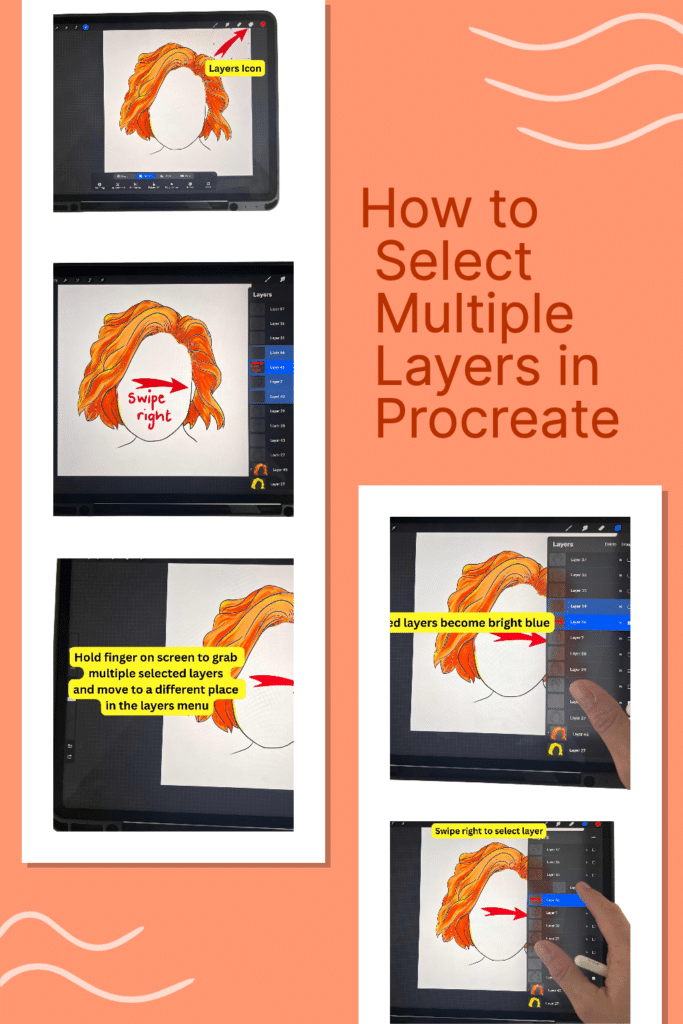
To select multiple layers in Procreate, you need to open the Layers panel. Once you open the Layers panel, you can swipe right on each layer you want to select.
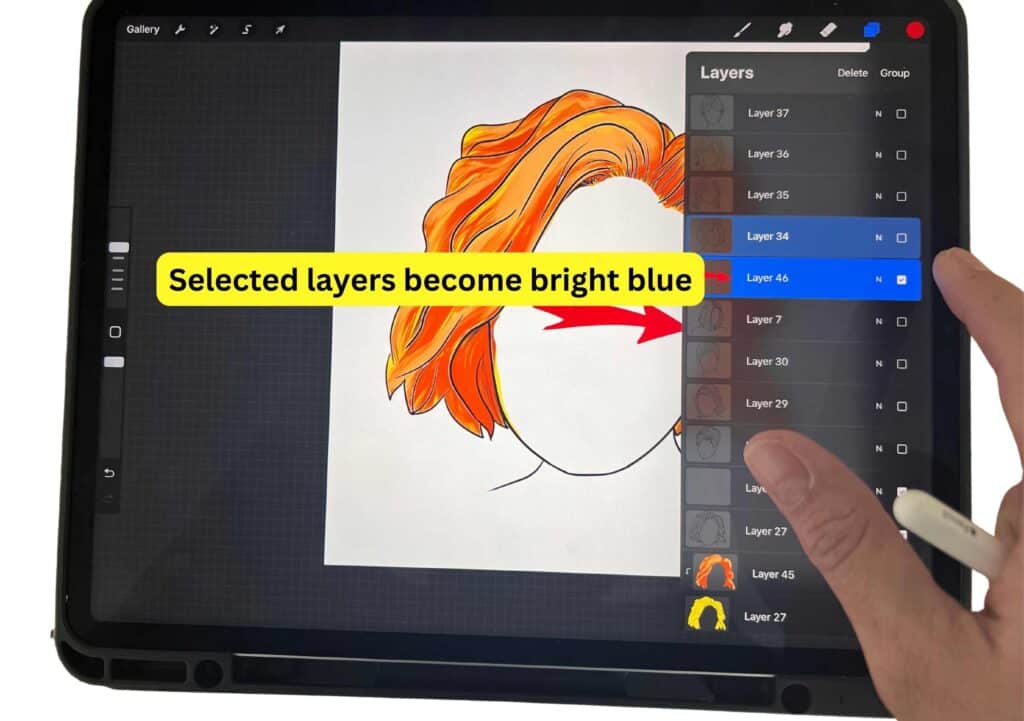
The primary layer will be highlighted in bright blue, while the other layers you have selected will be highlighted in dark blue. If you want to deselect a layer, you can swipe right on it again.
If you want to select all the layers in your canvas, you can tap and hold on any layer and then select “Select All” from the menu that appears. This will select all the layers in your canvas, and you can then perform actions on all of them at once.
How to Group Layers
Grouping layers in Procreate is a great way to keep your artwork organized. To group layers, select the layers you want to group and tap the “Group” button in the Layers panel. You can then name and move the group around as a single unit.
How to Move Layers
Moving layers in Procreate is straightforward. You can select a layer or group of layers and then drag them around the canvas. You can also use the “Transform” tool to resize, rotate, or skew the selected layers.
How to Deselect Layers
If you want to deselect layers in Procreate, you can swipe right on the layer again. Alternatively, you can tap on an empty area of the canvas to deselect all the layers.
By mastering the ability to select, group, move, and deselect multiple layers in Procreate, you can easily create complex artwork. These features are essential for any digital artist who wants to take their work to the next level.
Understanding Layers in Procreate
Layers are an essential part of creating digital art in Procreate. They allow you to work on different artwork elements independently, making it easier to edit and adjust your work as you go.
This section will cover what layers are, why you should use them, and how to create them in Procreate.
What are Layers?
Layers are like sheets of transparent paper that you can stack on top of each other. Each layer contains different elements or objects of your artwork. For example, you can have one layer for the background, another for the main subject, and another for any additional details. You can adjust each layer separately without affecting the other layers.
Why Use Layers?
Using layers in Procreate has several benefits. First, it allows you to work on different elements of your artwork independently, making it easier to edit and adjust your work as you go.
Second, it allows you to experiment with different effects and styles without affecting the rest of your artwork.
Finally, it makes it easier to export your artwork in different formats, such as PNG or PSD.
How to Create Layers
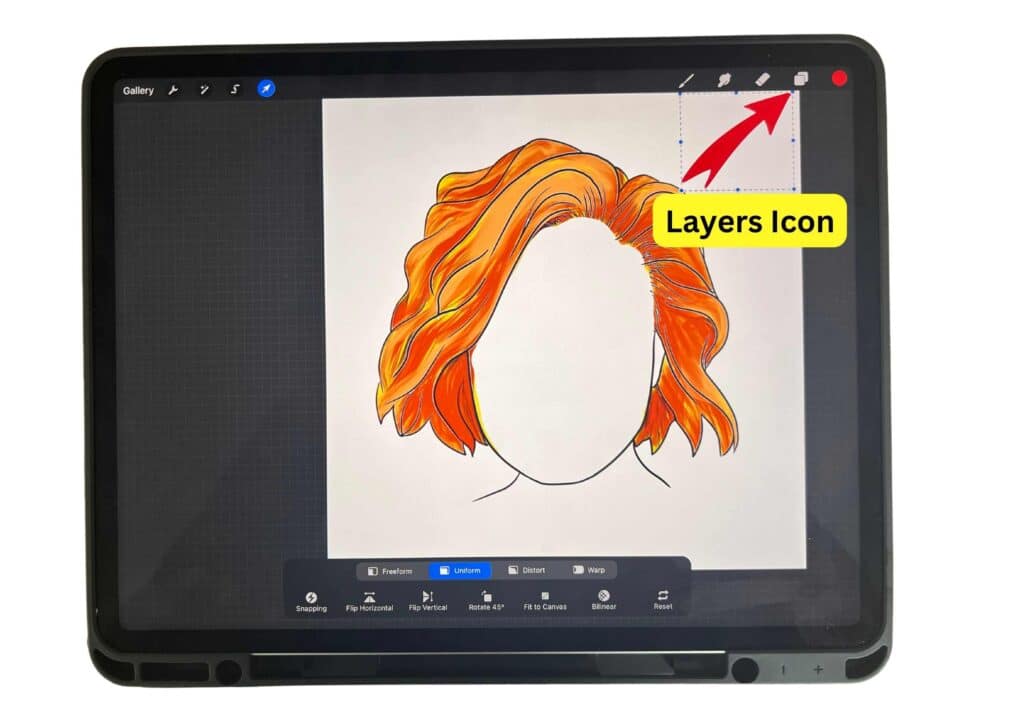
Creating layers in Procreate is simple. To create a new layer, tap on the Layers icon in the top right corner of the screen. Then, tap on the + icon at the bottom of the Layers panel.
You can also duplicate an existing layer by swiping left on the layer and tapping on Duplicate. To delete a layer, swipe left on the layer and tap on Delete.
You can also adjust the opacity and blending mode of each layer. Opacity controls how transparent or opaque the layer is. Blending mode controls how the layer interacts with the layers below it.
For example, the Multiply blending mode makes the layer darker and blends it with the layers below it.
Copying and Pasting Layers in Procreate
Copying and pasting layers in Procreate is a useful technique that can save you a lot of time.
Whether you’re working on a complex digital art project or simply trying to duplicate a layer, this feature can come in handy.
Here’s how to copy and paste layers in Procreate:
How to Copy Layers
To copy a layer in Procreate, follow these steps:
- Open the Layers panel.
- Swipe left on the layer you want to copy to reveal the layer options.
- Select “Duplicate” to create an exact copy of the selected layer.
- The new layer will appear directly above the original layer in the Layers panel.
How to Paste Layers
To paste a copied layer in Procreate, follow these steps:
- Tap on the layer above which you want to paste the copied layer.
- Select “Paste” from the toolbar.
- The copied layer will be pasted directly above the selected layer.
How to Adjust Pasted Layers
After pasting a copied layer in Procreate, you may want to adjust its position, opacity, or blending mode. Here’s how:
- Select the pasted layer in the Layers panel.
- Use the Move tool to adjust the layer’s position.
- Use the Opacity slider in the Layers panel to adjust the layer’s opacity.
- Use the Blend modes in the Layers panel to change the way the pasted layer interacts with the layers below it.
Copying and pasting layers in Procreate is a simple yet powerful feature that can help you work more efficiently.
Whether you’re duplicating layers, moving elements between canvases, or experimenting with different effects, this feature is sure to come in handy.
Deleting Layers in Procreate
Deleting layers in Procreate is a straightforward process that can be done in just a few clicks. Whether you want to delete individual layers or grouped layers, this section will guide you through the process.
How to Delete Individual Layers
If you want to delete a single layer in Procreate, follow these simple steps:
- Open the Layers menu by tapping the icon that looks like two squares stacked on top of each other.
- Select the layer you want to delete by tapping on it.
- Tap and hold the layer until a pop-up menu appears.
- Select “Delete” from the pop-up menu.
Once you’ve completed these steps, the layer will be deleted from your canvas.
How to Delete Grouped Layers
If you want to delete multiple layers at once, you can group them together and then delete the group. Here’s how to do it:
- Select the layers you want to delete by swiping right on each layer.
- Tap the “New Group” button at the top of the Layers menu.
- Tap the group you just created to select it.
- Tap and hold the group until a pop-up menu appears.
- Select “Delete” from the pop-up menu.
Deleting a group of layers is a quick and easy way to keep your canvas organized and clutter-free.
Deleting layers in Procreate is a simple process that can be done in just a few clicks. Whether you want to delete individual or grouped layers, the steps are easy to follow and help you keep your canvas organized and clutter-free.
Procreate is a Powerful Digital Art App
Procreate is a powerful digital art tool that has become increasingly popular among artists and designers.
One feature that makes Procreate stand out is its layering system, which allows users to create complex compositions by stacking different elements on top of each other.
However, when working on a complex project, it can be challenging to manage multiple layers efficiently.
Fortunately, Procreate offers several ways to select multiple layers at once, making it easier to organize your work and speed up your workflow.
Whether you’re working on an iPad or another compatible device, selecting multiple layers in Procreate is straightforward. By tapping and swiping on the Layers panel, you can quickly select, move, delete, and group multiple layers.
This feature is especially useful when you want to apply changes to the selected multiple layers at once, such as adjusting their opacity or blending modes. With a little practice, you’ll be able to select multiple layers in Procreate like a pro.
Top Tips for Working With Layers in Procreate
1) Keep things tidy with labeled layers:
Naming your desired layers like “Sketch” or “Shading” keeps your digital workspace organized and helps you quickly find the layer you need. Trust us, your future self will thank you!
2) Mix and match with blending modes:
Tweak layer opacity and experiment with blending modes like Multiply or Overlay to create some seriously cool effects. It’s like magic, but for your digital art!
3) Lock it up to stay worry-free:
Accidentally painting on the wrong layer? Not anymore! Lock those layers you don’t want to edit and paint away without any oops moments. Phew!
4) Master the art of non-destructive editing:
With clipping masks, you can add oodles of style to your select layers without changing the original artwork. Just create additional layers, clip ’em to the layers below, and let your creativity run wild. The best part? You can repeat the same process for each separate layer!
5) Alpha lock for the win:
Want to add shading or textures like a pro? Just enable alpha lock on a layer and paint only on the existing pixels. Now you can create amazing details without worrying about stepping outside the lines. Happy painting!
Learning how to use Layer in Procreate is Essential!
Learning how to select multiple layers in Procreate is an essential skill for any digital artist. It allows you to work more efficiently and easily make complex edits to your artwork.
Following the simple steps outlined in this tutorial, you can select multiple layers in Procreate in just a few seconds. Whether you’re working on a new project or editing an existing one, this technique can save you a lot of time and effort.
Remember to use the layers panel to select and deselect layers, and to swipe right on each layer you want to select. You can also use the tap-and-hold gesture to select multiple layers at once.
And if you ever make a mistake, don’t worry – swipe right again to deselect the layer and start over.
With these tips and tricks, you’ll be able to select multiple layers in Procreate like a pro in no time. So go ahead and experiment with different techniques to find what works best for you!
Conclusion
Congratulations, you’ve now mastered the ins and outs of how to select multiple layers in Procreate! As you continue to explore and experiment with this powerful feature, you’ll find that your productivity and efficiency as an artist will skyrocket. No more getting bogged down in layer management – you’re now free to unleash your creativity and bring your artistic vision to life.
Remember, practice makes perfect, so don’t be afraid to put your newfound skills to the test. Keep pushing the boundaries of your digital art journey, and watch as your masterpieces come to life before your very eyes. Happy creating!
Other articles you may enjoy…

Wow great tutorial!!! Thanks!!!