As a digital artist, I know how important it is to save and organize my work properly. With Procreate being one of the best drawing and painting apps for iPad users, managing files within the app can sometimes be a bit challenging. In this blog post, I’ll share a simple guide on how to save your Procreate files to photos on iPad.
Using Procreate has been a fantastic experience for me. The sophisticated tools, the wide range of brushes, and the intuitive user interface make my life as an artist much easier. However, I initially felt a bit overwhelmed with file management, mainly when exporting my work to the Photos app on my iPad. But no worries, I’ve figured it out and now, I’m here to help you do the same.
How to Save Procreate Files to Photos on iPad
In the next few paragraphs, I’ll walk you through the steps to efficiently save and export your Procreate files as images to your iPad’s Photos app. This way, you can easily access, share, and store your work without any hassle. So let’s dive into the process and make sure your creativity is preserved without any bumps along the way!

Quick Overview: How to Save Procreate Files to Photos on iPad
In this quick guide, I’ll explain how to save your Procreate files to Photos on your iPad. It’s quite simple, and you’ll be able to access your artwork in your photo library in no time.
Firstly, open the Procreate app and ensure that you have the artwork file you’d like to save. After that, follow these steps:


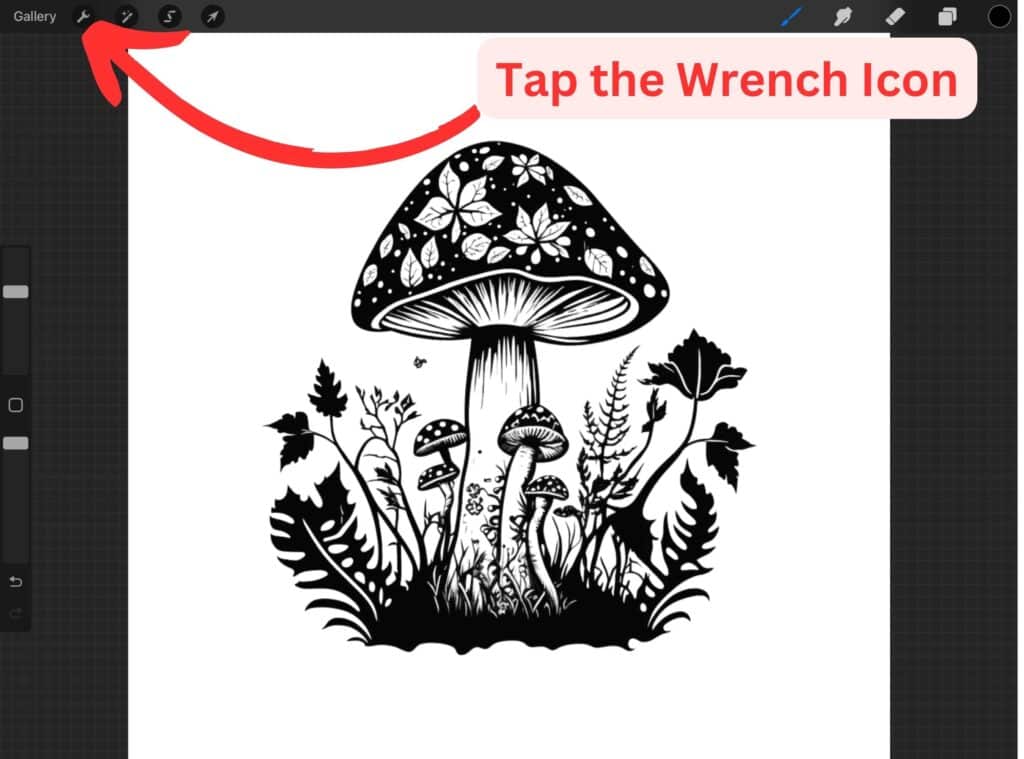
- Tap on the
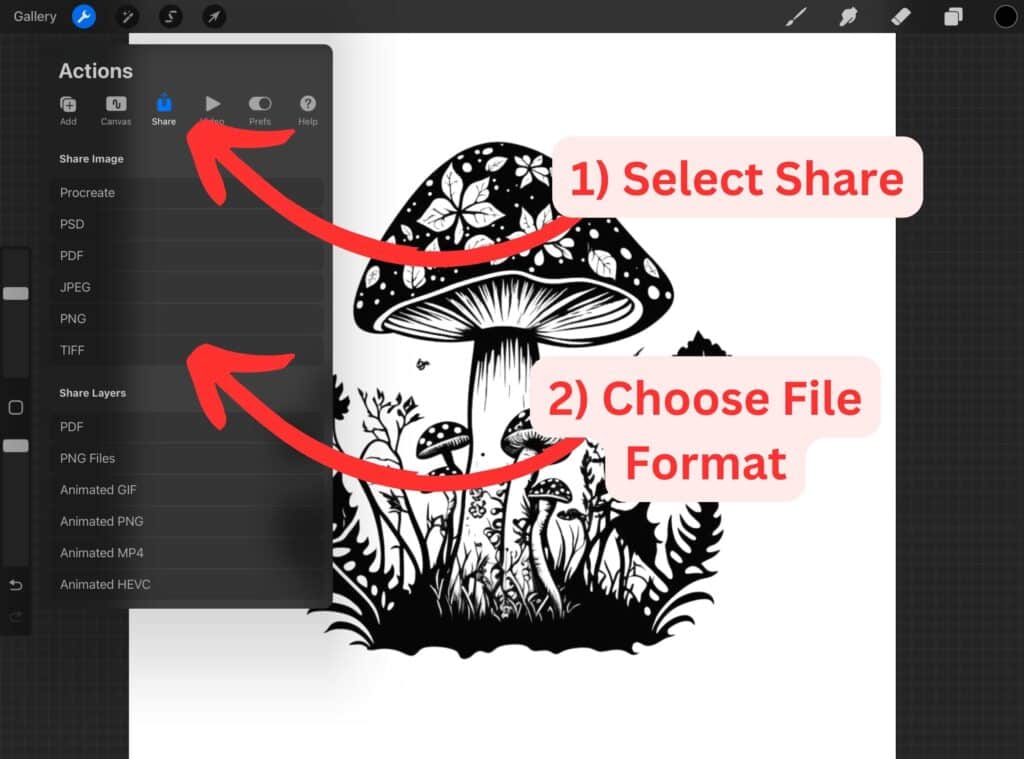
Actionsmenu, represented by a wrench icon, located in the upper left corner of the screen. - In the
Actionsmenu, you’ll find several options. Tap on theShareoption, which has an arrow pointing upwards. - A new set of options will appear. Choose the file format you’d like to save your artwork in, such as JPEG or PNG.
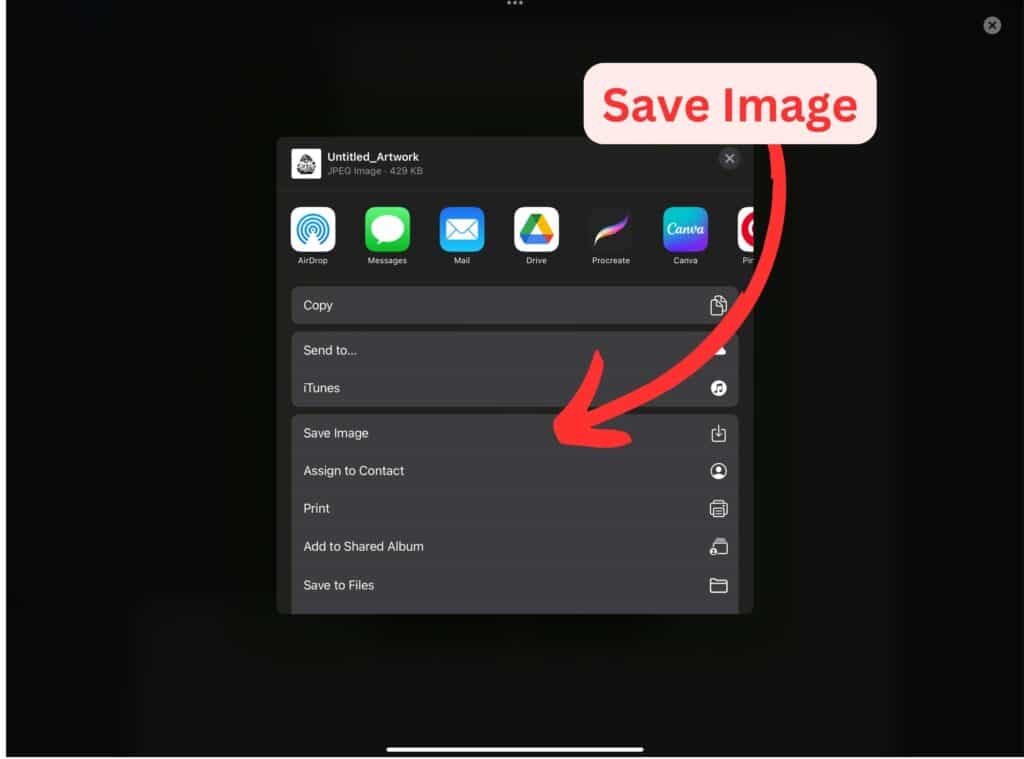
Once you’ve chosen a file format, your iPad will show you various destinations to save your file. Locate and tap on the Save Image option. This will save your Procreate file to your Photos app.
It’s essential to note that when exporting your file, remember to select the proper file format depending on your needs. For instance, if you want to preserve the layers in your artwork, export your file as a PSD.
And that’s it! Your Procreate file is now saved in your iPad’s Photos app.
Exporting Procreate Files to Photos
Preparing Your Artwork
Before exporting my Procreate files to Photos on my iPad, I make sure my artwork is ready. I double-check all the layers to ensure everything is in place. If needed, I merge layers down to reduce the file size for a smoother export process.
1. Open the Layers panel in Procreate
2. Review and organize your layers
3. Merge layers if necessary by pinching them together
Choosing the Right File Format
Next, I decide on the appropriate file format for my artwork. The two common formats are:
- PNG: Ideal for designs with transparent backgrounds or if I want to preserve layers
- JPEG: Suitable for images without transparency, such as paintings or illustrations
To maintain the image quality, I typically use PNG files for my Procreate artwork.
Using the Share Function
Now, it’s time to export my Procreate file to the Photos app on my iPad:
- Tap the “wrench” icon to open the Actions panel
- Choose “Share” from the menu
- Select the desired file format (PNG or JPEG)
- Tap “Save Image” to save the file to the Photos app
That’s how I export my Procreate files to my iPad’s Photos application. This process is quick and ensures my artwork is easily accessible for further use or sharing.
Different File Formats and Their Uses
In this section, I’ll cover some of the most common file formats and their uses when saving Procreate files to Photos on iPad.
JPEG
JPEG is a popular image format and is often used for photographs and images with many colors. This format uses compression, which results in smaller file sizes but can reduce the image quality. JPEG is ideal for sharing images online, but may not be suitable for high-resolution images or those with transparency.
- Pros:
- Smaller file sizes
- Widely supported
- Cons:
- Lossy compression
- No transparency support
TIFF
TIFF is another image format that provides lossless compression, retaining image quality while saving space. Unlike JPEG, TIFF files can maintain high resolution and support transparent backgrounds, making it a suitable format for professional artists and designers.
- Pros:
- Lossless compression
- Supports transparency
- High-quality images
- Cons:
- Larger file sizes
- Not as widely supported
PDF format is commonly used for documents and designs, as it retains formatting regardless of the device or software used.
PDFs can include both raster and vector graphics, as well as text, making it versatile for various purposes.
While it isn’t specifically an image format, it can be used to save Procreate files while maintaining their quality.
- Pros:
- Consistent formatting
- Versatile
- Widely supported
- Cons:
- Can be difficult to edit
- Not as optimized for images
PSD
PSD is the native file format for Adobe Photoshop and is often used for editing and working on images with multiple layers.
When saving Procreate files, a PSD export can be useful for further editing in Photoshop, as it maintains layers and other information. Keep in mind, though, that this format requires Adobe software for full functionality.
- Pros:
- Maintains layers and editing information
- For seamless import into Adobe Photoshop
- Cons:
- Large file sizes
- Requires Adobe software to access all features
Transferring Procreate Files to Other Devices and Platforms
In this section, I will explain how to transfer your Procreate files to other devices such as iPhones, iPads or Computers, and how to import them into Photoshop.
Airdrop to iPhone or iPad
You can easily use Airdrop to transfer your Procreate files from your iPad to your iPhone or another iPad.
- Open Procreate on your iPad, and tap the Gallery button.
- Tap Select in the upper right corner, and choose the files you want to transfer.
- Hit the Share button and then select Airdrop.
- Choose the iPhone or iPad you want to send the files to.
The files will appear in the Files app on your receiving device, and you can move them to the Photos app if needed.
Export to Computer via USB
To transfer your Procreate files to your computer, follow these steps:
- Connect your iPad to your computer using a USB cable.
- Open iTunes or Finder on macOS Catalina or later, and select your iPad.
- Click on the File Sharing tab.
- Choose Procreate from the list of apps.
- Select the files you want to transfer, and click Save To.
- Choose your desired folder on your computer and click Select Folder.
Now, your Procreate files should be saved on your computer.
Import to Photoshop
If you want to edit your Procreate files in Photoshop, exporting your file as a .psd file is the way to go. Here’s how:
- In Procreate, open the artwork you’d like to transfer to Photoshop.
- Tap on the Actions button (the wrench icon).
- Choose Share from the menu and select PSD.
- Airdrop your
.psdfile to your computer.
Now, you can open and edit your Procreate artwork in Photoshop.
Throughout this process, remember that transferring files can sometimes lead to unexpected results depending on software compatibility. By following this guide, you’ll be able to easily work across the Procreate ecosystem with iPhones, iPads, computers, and other creative software like Photoshop.
Managing and Saving Procreate Files on iPad
Organizing Files in Gallery
I like to use the Gallery in Procreate to keep my artwork and canvases organized. To make it easier to find specific files, I usually group them into folders by project or theme.
To create a new folder, I tap the “+” icon in the top right corner, give the folder a name, and then drag my canvases into it.
Backing Up Files to Cloud Storage
It’s important for me to ensure my files are safe from accidental loss, so I regularly back them up to cloud storage. I prefer using iCloud, but other cloud storage services like Dropbox or Google Drive work too.
To back up a file, I first export it as a Procreate (.procreate) or a PSD file format, then save it to my chosen cloud storage app. It’s crucial for me to always backup my progress in external cloud storage to be on the safe side.
Adjusting Settings and Preferences
I find it vital to customize the settings and preferences in Procreate to suit my workflow. In the app’s settings, I can adjust options such as Interface, Gesture Controls, and more.
I also like to access the Canvas settings by tapping on the wrench icon in the upper left corner while editing a canvas. From there, I usually configure sharing options, such as exporting a canvas as an image or PSD file.
I hope these tips help you manage and save files more effectively on Procreate!
Other articles you may enjoy…
How to Select Multiple Layers in Procreate
Unleash Your Inner Artist with Procreate Face Paint: Transform Your Look in Minutes!

