Last Updated on June 26, 2023 by Dee
Dive into this comprehensive guide dedicated to unraveling the art and science of creating a “Procreate transparent background”, a technique every digital artist should have in their toolbox.
Whether you’re a seasoned Procreate user or a newbie eager to explore this powerful tool, our easy guide will walk you through every step, ensuring you acquire this vital skill. So, let’s embark on this artistic journey together, where you’ll learn to make your creations pop like never before.
Procreate Basics
Procreate offers an intuitive platform to create stunning digital artwork with ease, one critical aspect being the creation of a transparent background in Procreate. This process commences by selecting a suitable canvas size for your project, which directly influences the resolution and quality of your final piece and the available layers you can utilize.
On the Procreate home screen, a simple tap on the “+” symbol lets you choose a custom canvas size. Setting up a higher resolution allows for greater detail in your artwork. The next vital step is understanding the layers menu. Here, all your artwork layers are displayed, and this is where you’ll make your image background transparent.
The layers menu houses the background layer, which by default, is filled with a solid color. To turn this background in Procreate into a transparent design element, uncheck the checkmark next to the background layer.
With this, you’ve successfully made your background transparent, but remember that this applies to only rasterized format. The rasterized file format preserves the display transparency and the details of your transparent background in Procreate.
Saving your masterpiece correctly is the final step. PNG files are your best bet as this file extension retains transparency. Thus, ensure your files are saved as png files, which are ideal for preserving the transparent elements in your design. With these steps, you’re ready to elevate your Procreate experience and create stunning transparent art pieces.
Creating a Transparent Background
Making a transparent background in Procreate is a relatively simple process. Here, you’ll find a friendly guide on how to create a transparent background using Procreate, so you can make your artwork look more professional and flexible for future use.
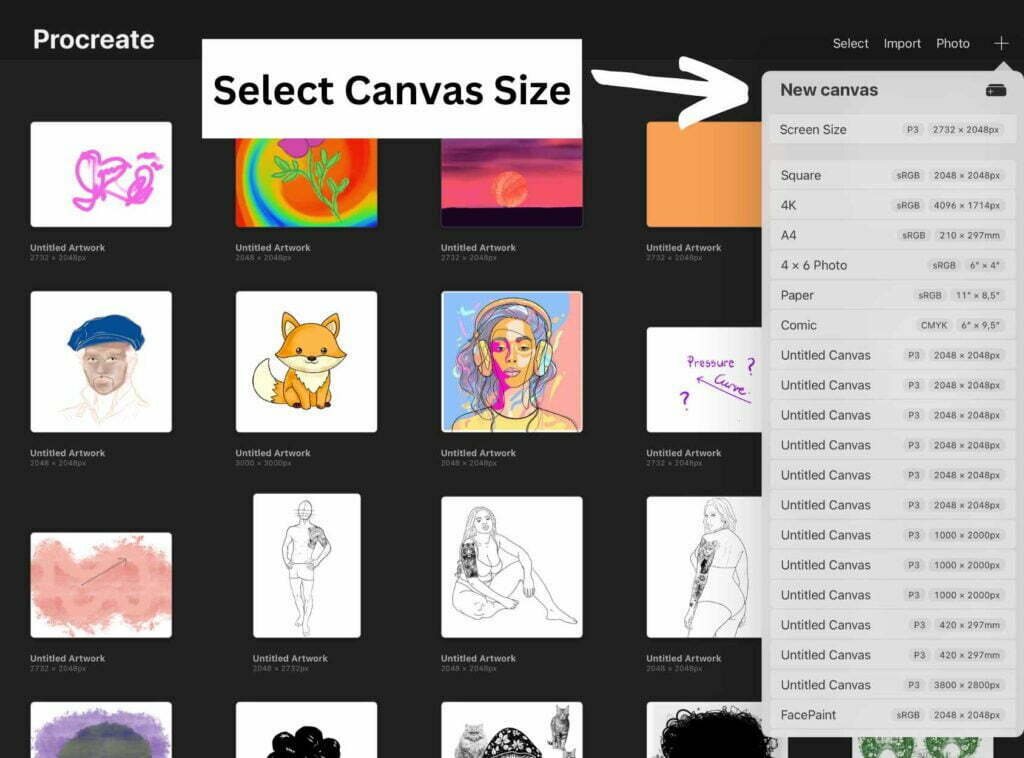
First, open your project in Procreate and navigate to the Layers panel by tapping on the icon in the top-right corner of the screen. Transparent backgrounds are created by disabling the visibility of the background layer. The background layer is usually found at the bottom of the Layers list.
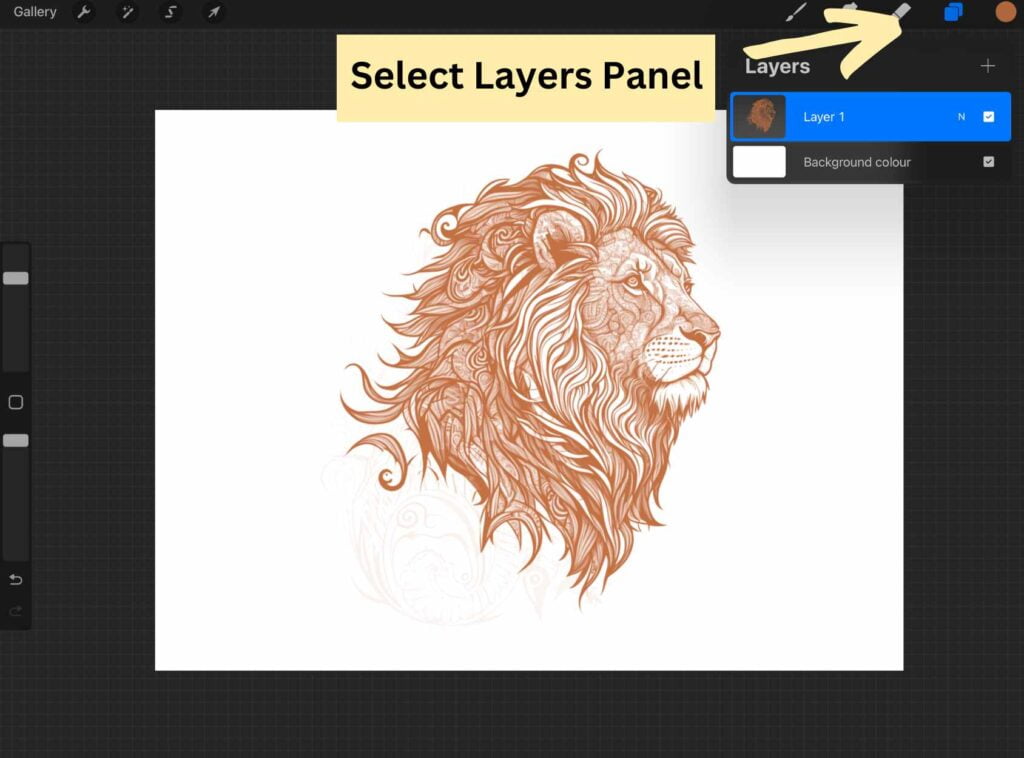
Next, locate the background color layer. It’s important to note that every Procreate document has a dedicated background layer which, by default, is filled with white color.
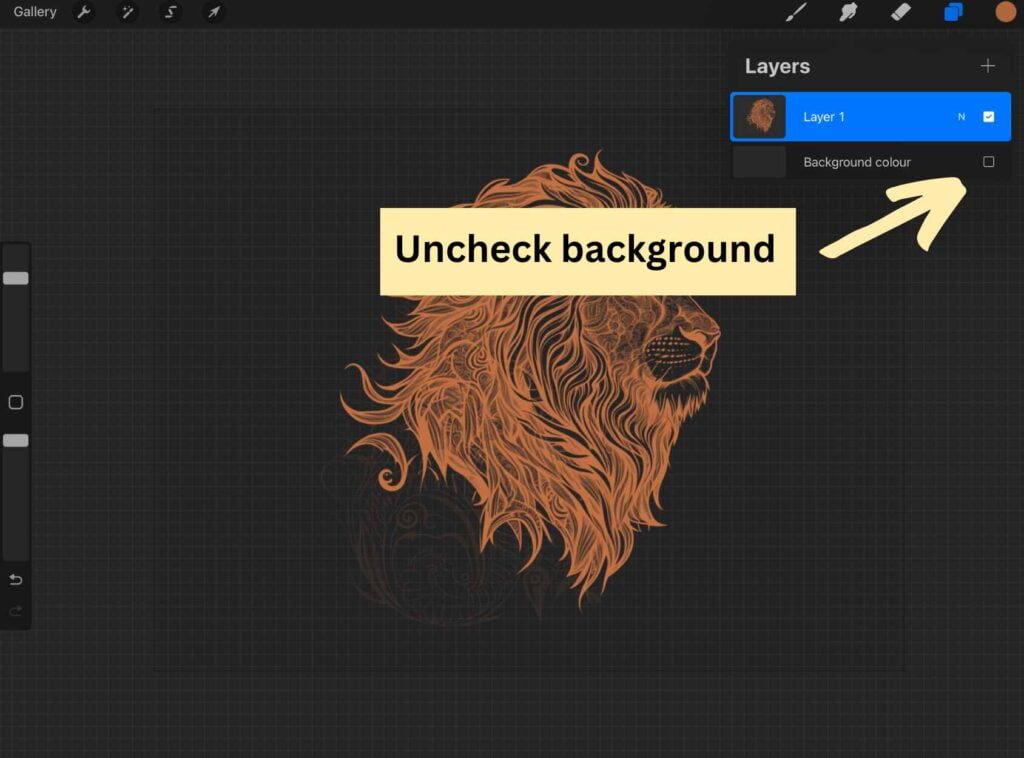
To make the background transparent, simply tap the checkmark icon next to the background layer to uncheck it. Once you have done this, the background should disappear, leaving you with a transparent background for your artwork.
Keep in mind that when you’re working with layers on Procreate, it’s essential to consider the order of the layers. Be sure to place your desired artwork on a separate layer above the transparent background. This will help you create a clean and organized workspace as you continue to make edits or adjustments to your design.
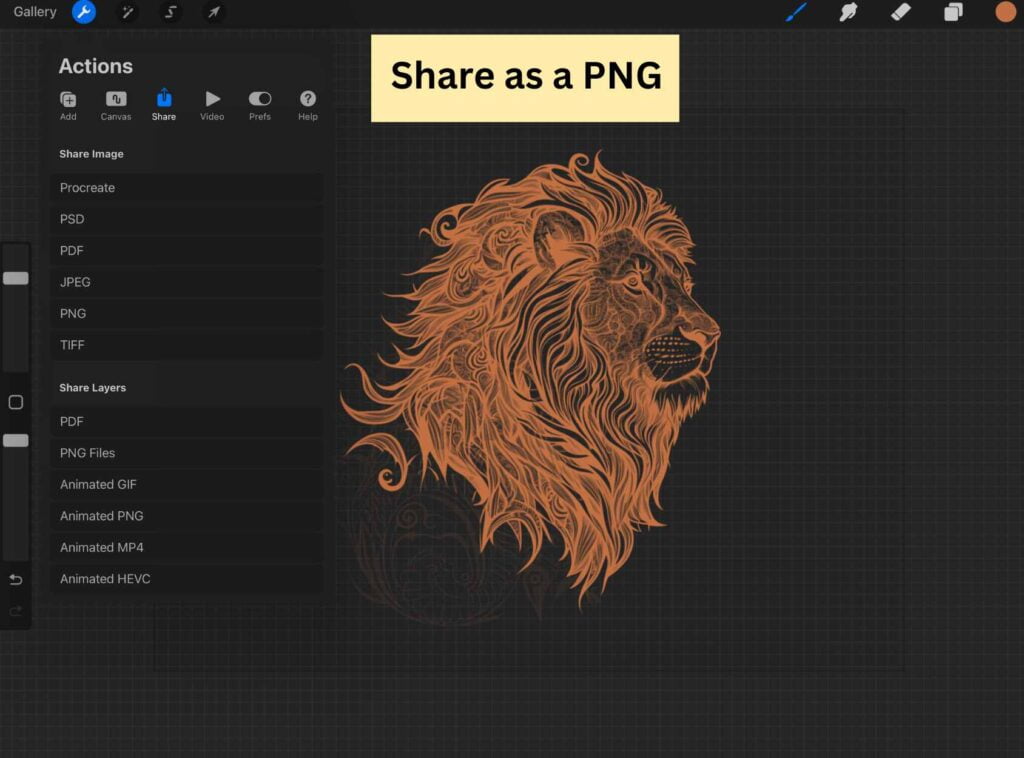
In order to save your artwork with a transparent background, be sure to export it in a file format that supports transparency, such as PNG. When exporting your file, you’ll be given the option to choose file type, and you should proceed to select PNG.
Working with Layers
In Procreate, working with layers is an essential aspect of creating digital art. Understanding how to use layers effectively will help you create stunning artwork with ease. In this section, we’ll explore how layers can be used in your artwork and how they can enhance your creative process.
Using Layers in Artwork
When you start a new project in Procreate, you’ll notice there’s already a default background layer with a white fill. To make your background transparent, simply tap on the checkmark next to this layer to disable its visibility. Now, when you export your art, it will have a transparent background.
Layers allow you to easily organize and manage different elements of your art, such as characters or grid lines. With layers, you can separate individual parts of your composition, making it easier to edit and manipulate specific elements without affecting the rest of your artwork.
For example, if you’re working on a complex illustration with multiple characters, you can create separate layers for each character. This way, you can quickly adjust the position, size, or color of a single character without impacting the others.
Another helpful use for layers is the creation of grid lines to guide your proportions and perspective. Create a new layer and draw your grid lines on it, then lower the opacity of the layer so it’s less intrusive and doesn’t disturb your creative process. You can easily turn on or off the visibility of the grid layer as needed while working on your art.
Don’t be afraid to experiment with your layers – you can easily reorder, merge, or delete them as needed. Merely swipe left on a layer to access these options. Procreate also allows you to group layers, making it even easier to organize your artwork.
Remember to name your layers to help you quickly find and identify the various parts of your composition. This little organization step will save you time and effort in the long run.
Exporting Your Artwork
This section’ll guide you through exporting your Procreate artwork with a transparent background in various formats. We’ll cover exporting as PNG, PSD, JPEG, and PDF. Knowing how to export in different formats will help you share your artwork with ease and compatibility.
Exporting as PNG
To export your artwork as a PNG file format, follow these steps:
- In Procreate, tap on the Actions menu represented by a wrench icon in the toolbar.
- Select the Share tab.
- Choose PNG from the list of file formats available.
- Make sure the background layer is turned off (unchecked) to ensure a transparent background.
Once you’ve completed these steps, your artwork will be exported as a PNG file with a transparent background, offering high-quality resolution and the ability to maintain transparency when used in other applications.
Exporting as PSD
If you need to export your artwork in a PSD format for compatibility with Adobe Photoshop, do the following:
- Access the Actions menu.
- Choose the Share tab.
- Select PSD (Photoshop) from the options.
This will export your artwork as a PSD file, maintaining layer information. However, please note that transparency might not be preserved when opening the file in Photoshop, and you may need to adjust the background layer in Photoshop accordingly.
Exporting as JPEG
While exporting as a JPEG doesn’t natively support transparency, here’s how to export your artwork as a JPEG file:
- Open the Actions menu.
- Tap on the Share tab.
- Opt for JPEG as the file format.
Remember, since JPEG doesn’t support transparency, your artwork’s background will not be transparent. This format is best suited for web uses where file size and compatibility are essential.
Exporting as PDF
If you need to export your Procreate art as a PDF file, follow these steps:
- Go to the Actions menu.
- Enter the Share tab.
- Pick PDF from the available formats.
While PDF files can support transparency, Procreate’s PDF export doesn’t currently preserve transparent backgrounds. If you require transparency, you’ll need to use image editing software, such as Adobe Illustrator or Photoshop, to modify the PDF after exporting.
Working with Design Elements
In this section, you’ll learn about various design elements in Procreate and how they can help you create impressive digital art with transparent backgrounds.
Adding Contrast to Designs
Contrast is a key aspect of any design, and it’s especially important when working with transparent backgrounds. In Procreate, you can add contrast by using different shades and colors in your design elements. This not only enhances the visual appeal of your digital art but also makes it more readable against various backgrounds.
To achieve maximum contrast, experiment with complementary colors, varying the brightness and saturation of your design elements. You can also experiment with opacity – check out my video on how to adjust opacity in Procreate.
Creating Logos
Procreate is an excellent tool for creating logos with transparent backgrounds. To start, open a new project with a custom size and toggle off the background color switch to ensure your canvas is transparent. As you design your logo, keep in mind the importance of contrast and readability.
When working on logos, ensure you group your layers efficiently and use layer masks as necessary. This will enable you to edit and refine your design easily. Use high-quality brushes and tools to create clean, crisp lines and shapes that stand out. And of course, remember to export your logo in PNG format to maintain transparency.
Designing Stickers
Stickers are another popular use case for Procreate and transparent backgrounds. Designing stickers is similar to logo creation, with a few additional considerations.
When designing stickers, consider the following tips:
- Use bold, clean lines to ensure the sticker design is easy to distinguish against backgrounds.
- Choose a minimal color palette to enhance the contrast and visual appeal of your stickers.
- Pay attention to the edges of your design, keeping them clean and smooth to avoid a pixelated look.
Once you have designed your sticker, refine your layers and use alpha lock to prevent unintentional color changes outside of the selected elements. Finally, save your sticker design as a PNG file to retain transparency.
Other articles you may enjoy…
Clipping Mask Procreate: A Quick Guide for Artists
How to Mix Colors on Procreate: A Simple Guide for Artists
Procreate Pressure Curve: Mastering Your Digital Art Strokes
