
Last Updated on April 20, 2023 by Dee
Hey there, fellow artists and Procreate enthusiasts! Working with layers can be one of Procreate’s most powerful and flexible features, but it can also be a bit confusing at times. Whether you’re a seasoned digital artist or just starting out, this post will help you navigate the world of layers in Procreate. In this simple guide, I’ll take you through the process of how to unmerge layers in Procreate, and we will also go over merging layers, grouping, and much more.
So let’s dive in and unleash the full potential of layers in Procreate!

How to Unmerge Layers in Procreate Step-by-Step:
Unfortunately, once you’ve merged layers in Procreate, there’s no built-in way to unmerge them. However, you can always undo the action if you haven’t made any other changes since merging.

To unmerge a merged layer, tap with two fingers on the screen, or tap on the “Undo” arrow in the top left corner of the interface. Keep in mind that undoing will only work if you haven’t made any changes since the merge.

How to Merge Layers in Procreate:

- Open the Layers menu panel by tapping on the “Layers” icon, which looks like two overlapping squares in the top right corner of your screen.
- Select the top layer you want to merge by tapping on it in the Layers panel.
- Tap on the “Merge Down” option (it looks like a downward arrow). This will merge the selected layer with the one directly below it.
Merging Multiple Layers: To merge multiple layers in Procreate at once, follow these steps:

- Open the Layers panel.
- Select multiple layers swipe left on each layer you want to merge, and tap on the checkmark that appears.
- Once all desired layers in Procreate are selected, tap on “Group” to create a new group with the selected layers.
- Now tap on the group you just created, and select “Merge Group” to merge all layers within the group into a single layer.
Check out my Procreate Stamps here!
What’s the Difference Between Merging and Grouping Layers?
Merging layers combines them into a single layer, making the layers’ content inseparable. On the other hand, grouping layers keeps them as separate layers but organizes them into a folder, allowing you to easily move, hide, or apply adjustments to the whole group without affecting individual layers.
How to Group Layers:
- Open the Layers panel.
- Swipe left on each layer you want to group, and tap on the checkmark that appears.
- Once all desired layers are selected, tap on “Group” to create a new group with the selected layers.
Why People Merge Layers
As digital artists, we often find ourselves working with numerous layers in our Procreate projects. While layers offer incredible flexibility and control, they can also become a bit overwhelming when we’ve got a ton of them! That’s where merging layers comes in handy.
Picture this: you’ve just finished sketching and coloring a beautiful character, but now you have more layers than you can count. Merging layers can help you simplify your project by reducing the number of layers you’re dealing with.
Combining layers with similar elements or those that belong to the same part of your artwork makes it much easier to navigate and manage your canvas.
I remember working on a detailed landscape piece with numerous trees, clouds, and other elements, each on their own layer.
Once I was happy with each element’s appearance, merging the layers helped organize my work and make it much more manageable. It was a game-changer!
Another great reason to merge layers is when you’re confident that certain elements of your artwork won’t require any further editing or adjustments. For instance, if you’ve perfected the shading on a character’s face and know that you won’t need to tweak it later, merging the shading layer with the base color layer can make your workflow more efficient.
What does “combine down” mean in Procreate?
In Procreate, the term “combine down” might be used to refer to the process of merging layers, which involves taking the content of two or more layers and combining them into a single layer. When you “combine down,” you essentially merge the selected layer with the one directly below it.
This differs from merging multiple layers, where you select several layers and merge them all simultaneously. It’s also distinct from grouping, which organizes layers into a folder-like structure without actually combining their content.
In a nutshell, “combine down” is the process of merging a single layer with the layer below it, while merging refers to combining multiple layers, and grouping is a way to organize layers without merging their content.
A Friendly Trick for Preserving Layers While Merging: A Personal Tale
We’ve all been there: you’re working on an intricate piece, and you’ve just merged some layers, only to realize you need to go back and make changes to one of the original layers. I’ve definitely been there, and I’ve discovered a nifty workaround to make sure I don’t lose any layers through the process of merging them.
One day, I was working on a detailed portrait with multiple layers for the hair, eyes, and skin. After merging the layers, I suddenly noticed that the eye color needed a slight adjustment. If only I had saved a copy of the original layers before merging! That’s when I came up with this handy trick to prevent such a situation from happening again.
Here’s my personal workaround for preserving layers while merging them in Procreate:
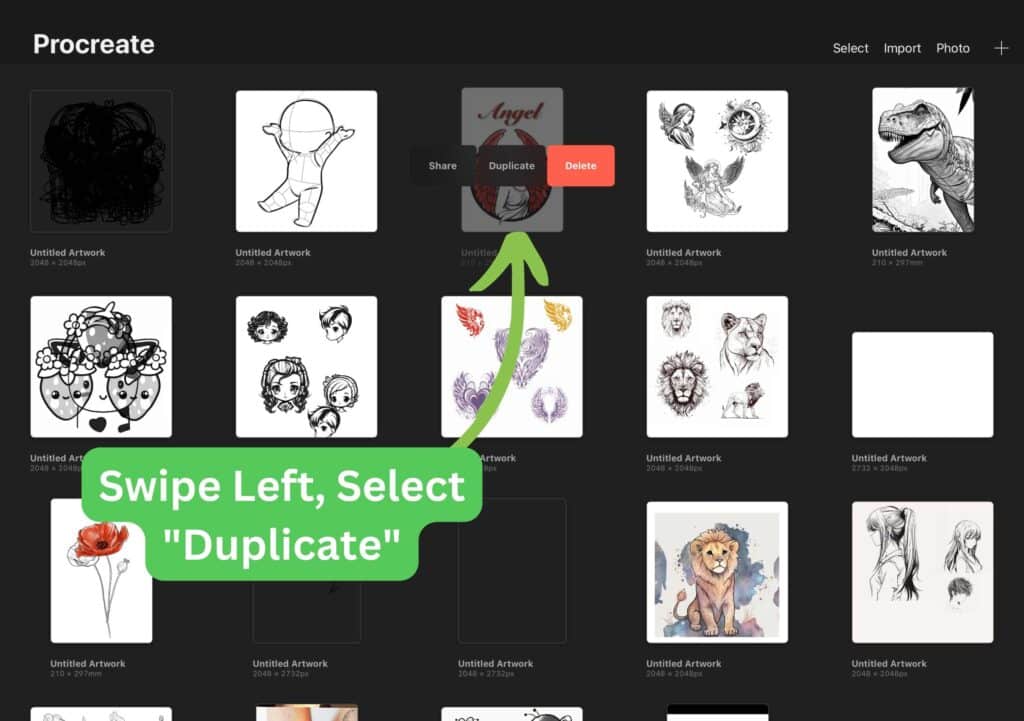
- Before you merge any layers, create a duplicate of your artwork. To do this, go to the Gallery view, swipe left on your artwork thumbnail, and tap on “Duplicate.”
- Open the duplicated artwork and work on merging the layers there. This way, you’ll always have the original artwork with all the separate layers intact, just in case you need to go back and make changes.
- If you ever need to access the original layers, simply open the original artwork from the Gallery, and you’ll find all your layers safe and sound.


This trick has saved me numerous times when I’ve needed to make adjustments after merging layers. It’s a simple and effective way to ensure you don’t lose your original layers, while still benefiting from the convenience of merging layers in your working document.

Frequently Asked Questions about Merging and Unmerging Layers in Procreate
Q: How do I merge two layers in Procreate?
A: Select the top layer you want to merge, then tap on the “Merge Down” option in the Layers panel.
Q: How do I combine all layers into one?
A: Pinch all the layers together in the Layers panel, or create a group with all layers and then merge the group.
Q: How do I merge layers without losing effects in Procreate?
A: Unfortunately, merging layers will always combine their content. To maintain separate effects, consider using layer masks or clipping masks instead.
Q: What is the difference between flatten and merge in Procreate?
A: Flatten combines all layers into one background layer, while merge combines only selected layers or a specific group.
Q: How do I combine two images in Procreate?
A: Import each image as a separate layer, then merge the layers as needed.
Q: How do I group layers in Procreate without merging?
A: Swipe left on each layer you want to group, then tap on “Group” in the Layers panel.
Q: How do I select layers and groups in Procreate?
A: Tap on a layer or group in the Layers panel to select it.
Q: How do I group layers in Procreate animation?
A: Grouping is not supported in Procreate’s Animation Assist. Instead, merge the layers you want to animate together.
Q: How do you flatten art in Procreate?
A: Pinch all layers together in the Layers panel, or tap on the top layer and select “Flatten” from the menu.
Q: How do I separate grouped layers in Procreate?
A: Open the group in the Layers panel and drag each layer out of the group individually.
Q: How do you get rid of a group in Procreate?
A: Open the group in the Layers panel, then swipe left on the group name and tap “Delete.”
Q: How do I group multiple layers in Procreate?
A: Swipe left on each layer you want to group and tap on “Group” in the Layers panel.
Q: How do you use layers on Procreate?
A: Layers allow you to separate and organize different elements of your artwork. Access layers through the Layers panel, where you can add, delete, reorder, and adjust layer properties.
Q: How do I make a layer go behind another in Procreate?
A: Tap and hold the layer in the Layers panel, then drag it below the desired layer.
Q: How do I separate an image into layers in Procreate?
A: Import the image as a layer, then use the selection tools and layer masks to separate desired elements onto new layers.
Q: What does merge layer down mean?
A: Merge layer down combines the selected layer with the layer directly below it, creating a single layer with the combined content.
Q: How do I merge layers down in Procreate?
A: Select the top layer you want to merge, then tap on the “Merge Down” option in the Layers panel.

Conclusion
Now that you have a better understanding of how to unmerge layers in Procreate (as well as manage layers in other ways!), you’ll be able to easily create even more complex and beautiful artwork. Don’t forget; practice makes perfect! If you found this guide helpful, be sure to check out my article on how to Copy and Paste in Procreate to take your skills to the next level. Happy creating 🙂
Other articles you may enjoy…
How to Undo on Procreate: Easy Tips to Redo & Undo
How to Erase on Procreate: A Comprehensive Guide
How to Blur in Procreate | 3 Easy Techniques
Looking for a Procreate Star Brush? 3 Free Procreate Star Stamps